Camera Movement:
The camera will be controlled by both mouse and keyboard. The
hardest part about learning this setup is using both hands at
the same time, on two different mediums, in order to manipulate
the camera. Once you can master this part the rest should be easy.
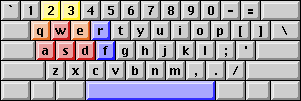
First the mouse needs to be set to orbit the camera when you move the cursor to the far edges of the screen.
Orbiting is much more effective then turning in myth and should always be used to change camera direction.
Unlike turning, orbiting will keep the view centered on your targets -- so you can turn
without losing sight of the action.
The WASD keys form an inverted-t to control the rest of the camera. You
simply rest your middle finger on the W key and that will move the camera forward. From there you can simply move down a key to S when you need to move the camera backwards. The fingers on either side of your middle finger rest on the
A and D keys. These are used to sidestep the camera left and right without changing direction. As for
turning keys, just stick them somewhere far away because again, you should
never use them.
Now you should be able to do anything with the camera. Try following
some berserks with W and then pan around them by sidestepping with A or D while orbiting at the same time with the mouse in the opposite direction. Now you can circle around things while
keeping them centered in your view and keep up with them if they
are moving. Neat (?).
Troop Selection:
Now comes the part most players, even very experienced ones, never
bother to get into -- the use of presets. It is true that taking
your eye away from the action to look down and press command-#
to select a group is cumbersome and unpractical in battle, but
there is an alternative far too many players overlook...
Set the F key to toggle presets and now you are set. With your pointer finger resting on D you should have no trouble reaching over and hitting F as needed. At the beginning of every game select all of your
melee units of one type and then press and hold command-1 until it says your preset is set. Then take all melee units of
another type and stick them in command-2. Put your archers in command-3, your dwarves in command-4, and so on.
Note: You may want to leave wights and other lesser used units out
of presets because the more groups you have the more bogged down
you can get (read below).
Now as you press F it goes from one preset to the next in a loop and each time it
both selects and centers the screen on the units in that group.
The beauty of this is that with just a few taps of the F key in succession you can instantly have your units selected
and in view -- every time. Try to limit yourself to 3 or 4 groups
usually thrall, warriors, archers, and ghols or dwarves in that
order for light maps. Always put the same units in the same number
and do it in the order that you like to move your units in formation
one at a time by. After a few games you will "know" how many taps
of the F key it takes to get to whichever units you want to command. It
is insanely quick, and much faster then finding the units with
the camera and band selecting or double clicking (which sometimes
doesn't work on your first try).
Issuing Commands:
Right my son, now you can move your camera around and select your
units, but from there you need quick and easy ways to issue the
commands at your fingertips.
Keep the spacebar for stopping your units on the dime. It can easily be hit with
your thumb when necessary and it will stop the selected units
dead in their tracks no matter what the condition. You can spacebar stand some thrall on your home flag in a flag rally and they will never
get lured away no matter what. You do have to watch them though
because each thrall will only fight back if they are attacked
directly by another melee unit in their range. This means that
if you are attacked by a large group all but the one thrall being
attacked at the time will sit their not doing anything until their
turn comes up. Not a very effective way to fight.
(If anyone uses the Guard command instead of spacebar standing please let me know how it differs because I never use it.)
Now set the Q and E keys for Scatter and Retreat your troops. You can easily hit those keys with your ring and
pointer fingers. When you push scatter and retreat your units
move a fractional amount faster then normal. Not much, but it
makes a huge difference when that dwarven cocktail is about to
go off and every millisecond closer to the blast you are the more
splash damage you'll take. There are also several other less obvious
uses for the scatter key you may not have pictured....
Quickly tapping the retreat key for instance, when you have a
long line of archers selected will cause them to break down the
middle and start running in opposite directions. If you spacebar stop them right away you will give your archers space while maintaining
the long line. Now they can all get good shoots off and when the
enemy archers miss one of yours, the arrow will hit the ground
and not another of your archers right next to it.
Finally you need a special ability key to detonate wights and
heal with journeyman. Use R because it is easily reachable with the pointer finger. Now you
are set, heh.
Using Formations:
The first step in jumping from a total newbie to a basic player
is learning how formations work and becoming accustomed to using
them constantly.
There are only two formations you really ever need and only one
that you will use on a regular basis. The Long Line (key 2) and the Loose Line (key 3) formations. The Loose Line will only be used on occasion when you need to get one group
of units past another group with no space to go around. All other
times you should have every preset group fanned out in a Long Line facing the enemy by gesture clicking (explained at end). This is easy to accomplish because from the
default resting spot of your middle finger on the W key you can reach up and hit 2 or 3 each time you move somewhere.
Finishing Touches:
Good work, you've got everything you need, but there are a few
more keys to set for completeness.
I don't know about you but I hate using the Y key to talk in multiplayer. You will certainly agree if you take
a break and play a week of Diablo or Warcraft (which both use
return to type messages) and then return to Myth. Thus I set return to yell and set / to select all units on the screen because that is what return originally does. Then, because you can't leave any controls blank
I make < and > by the turning keys, cause they look like little arrows pointing to turn, heh.
I then make [ and ] be the camera zoom keys. Obviously I don't use either in the game, but it's just
a nice place for them. =)
Frequently Asked Questions:
1) What is "gesture-clicking" and how is it done?
Gesture clicking lets you specify the direction a formation is
oriented when you are moving your troops. After you have selected
a group of units, first press the number for the formation you
want them to use. Then instead of regular-clicking where you want to go, option-click (right-click on a pc) where you want the center of the formation, then while
keeping the mouse down, drag your mouse and you will see a translucent
arrow following the cursor. Once it is pointing the direction
you want release the mouse button and your troops will move to
where you first click and their formation will be oriented in
the direction of the arrow.
Note: In Myth versions prior to 1.1 you will not "see" the translucent
arrow but the effect of dragging the mouse is the same.
Note: Many players claim that regular clicking will orient the formation
in the direction you drag as well but this is not true. When you
regular click the formation is oriented (correct me if i am wrong)
in the direction the cursor was moving before your first click.
To get 100% accurate directions, every time, without hasty flicks
of the mouse and a degree of luck, hold down that option key!
A screenshot of the above configuration as it looks in the Myth prefs window
is available.
A printable version of the keys are also available for quick reference.