Last Man on For Carnage Apply Within
By groo <bcantin@home.com>
 |
Game Setup
- For Carnage Apply Within (light)
- Last Man on the Hill
- 10-12 minutes
- Unit Trading On
- Vets Optional
|
This is one of my favorite maps to play on. While I do admit I am good at this map, I know I am not the best
player. Many folks will find flaws in the strategy given here.
Others will not agree with what I have written. This was mainly
written to help folks that either want to learn how to play this
map better or just want to look at other strategies than they
are currently using. New players to the game will also enjoy
this as they can understand why someone is moving units toward
a certain spot. If you are teaming up with someone, then this
can also help out a little with coordination movements and tactics.
I understand that I cannot point out every variation or cover
all aspects of every tangent. This strategy is meant to be seen
as a guideline only. Be flexible with it. Learn from your mistakes
(and your enemies mistakes). And as always have fun!
How to Fight with Soulless (basic overview)
Unlike the Fir'Bolg, the soulless can move over any terrain. This is a big plus. But unlike any other unit, if they are hit
with a missile attack (an arrow or spear) it will pass thru their
body and continue on its path. This is a very important point.
Soulless are the key to this map. If you can take out your enemies soulless, then he is severely
restricted to which paths he can take. If you lose your soulless,
then your army must run from your enemies soulless, as they can
perch on the rocks and make spaghetti out of your troops all
day long.
Many folks have asked me how my soulless 'always hit'. Well,
they don't. When attacking soulless, you want to aim at any soulless
that are grouped together. And aim at the one furthest behind. This
has 2 advantages. You can still miss your intended target and
hit another by accident. You can also hit your target, and there
is a good chance that you will also clip the soulless in front
of your intended target (getting 2 hits for 1). Also, high ground makes the range farther. If you can get in 2 shots before your
enemy can get in his first shot, then you are that closer to winning
the skirmish. If you understand how to properly use soulless against
other soulless then you are well on your way to winning at this
map or at least not getting crushed like a grape.
|
Unit Selection
- 8 Soulless
- 11 Warriors
- 5 Thrall
- 2 Dorfies
You can choose to max warriors and/or only get 1 dorf. Experiment
and as always don't be stuck in a rut for what you get and what
you do with your units. |
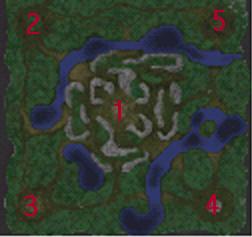
You have the hill, so keep it. You want to deny the 5 (or 3)
spot from gaining ground toward the center with your dorf(s). If you can manage that, then he will have to move toward number
4 (most common) or number 2 player. If he insists on charging
the hill, you have your dorf, knights, and soulless all set to
take care of him.
Your biggest threat is the 2nd and 4th spot so keep an eye on
them. You should already have a hold on one of the entrances to
the pit which is worth its weight in gold if you need to make
your way from the edge to the center.
|
Movement
|
|
|
Soulless are the key to this map. Get them on one of the 2 high hills first and foremost. I don't
suggest breaking them up into separate groups.
Next important is your dorf and knights. Move them and then move
your thrall. If you get your soulless behind your thrall then
you are in a world of hurt when you get caught with your pants
down. |
|
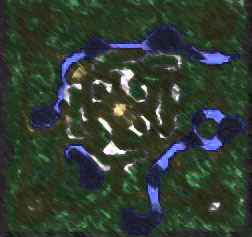
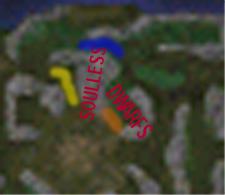
Setup
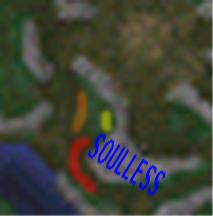
Your best bet is to stake out this hill with your soulless and dorf(s) set up as indicated.
You can also set up your warriors either at the blue spot or the yellow.
Your Thrall should be at orange so as to protect your dorfs from a soulless attack by spot number
4. |
 |
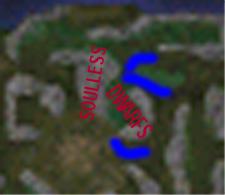 |
Your dorf has satchel charges. Don't be afraid to drop a few in the areas indicated as blue in the picture to the left. This will make your opponents hesitate
in charging up either location. You can drop a few charges at
each.
Be creative. |
|
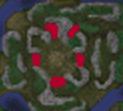
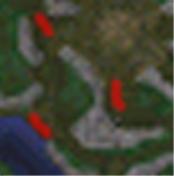
Alternate Setup
Move soulless to the top of this hill and move knights to the red, dorf(s) to yellow and thrall to orange.
Don't be afraid to drop a few satchel charges at the red in this bottom picture. |
|
|
They might come in handy later. |
Keep an eye on the 5th or 3rd spot. Send a scout so you know if they have moved toward 2 or 4. If
you get caught offguard then your smushed toast.
If the 2nd or 4th spots get trigger happy and try to pick of your
dorf, be sure to move your thrall in front to protect the dorf.
Move your soulless over to make him run away. If he doesn't move
then you should win the soulless battle because of the height
advantage.
Glance at the other players when you have a second. Keep an eye
on the their strength (hit F7) so you know who to guard against
in the final minute.
If the number 5 player has not moved toward 2 or 4 then you know he's gonna rush up when the clock
hits that last minute. If player 2 has set up at the base of the
hill, then watch to see where he charges up to. Try to send a
knight over to see what player 3 is up to. Don't be afraid to
move your soulless around to attack player 2 or 4 if they make
a mistake in their unit placement or movement
The Final Minute (sudden death)
You should have your knights and thrall already set to a preset quick key (alt/command + #). Your soulless
are now mainly used to pick off either enemy soulless that might
be trying to stick your men or you might want to attack enemy
melee.
Manuever your dorf to either side (not behind) your knights and thrall (you don't
want your dorf to toss grenades on you, do ya?).
If nobody has started to contest the flag and there are 10 seconds left, pick whoever is closest
and charge him. If nobody can get to the flag in time, then you
win.
However, most likely, someone will contest the flag and your speakers
will bellow out 'sudden death'. If possible, move your troops
within range to grab the flag if it needs to be contested quickly.
When two folks start to fight it out, try to sandwich whoever
is strongest if possible.
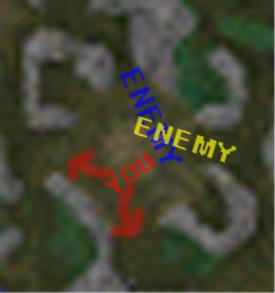
If you think you might get sandwiched, you can try to run down the center of the pit and hope that the
two folks that tried to squish you duke it out (you can always
hope at any rate).
It works something like this... |
Before
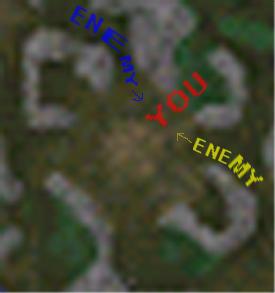
After
|
Remember, think. If you try to follow this strategy to the letter and get your
ass kicked, then you are not really following this strategy. This
is meant as only a guideline. If in the first 3 minutes for example, every player is headed
toward you, don't be afraid to leave the center and probe for
another way back. You can't win if you are crushed.
How to Beat This Strategy
I feel that starting in this position is the BEST of all 5. If
you are going up against someone that has the hill and know's
what they are doing then good luck. Here are some tips though.
- Watch his soulless. If possible attack his soulless when he is
involved with another player.
- If you are being blocked (starting in either 3 or 5) send scouts
to 2 and 4 so you know which way is safer to go.
- Keep an eye on F7
- I you start in 2 or 4, try to pick of his dorf if possible. If
he moves his soulless to attack, retreat to a better place for
a counter-attack if he continues to chase.
Please send any questions, comments or other replies to this strategy
to groo.
|


